
[ad_1]
A deployment information for wi-fi ThousandEyes brokers deployed to watch the Black Hat 2023 convention by means of Adam Kilgore & Ryan MacLennan
ThousandEyes (TE) Black Hat 2023 Deployment Information
This information paperwork the setup and set up procedures used to deploy ThousandEyes at Black Hat 2023. This record covers configuration of the TE agent on Raspberry Pi 4, together with each stressed and wi-fi configurations. Wanted {hardware} for the quite a lot of setup purposes also are indexed.
Boundaries of Deploying ThousandEyes Endeavor Brokers on Raspberry Pi
Please notice that TE Endeavor Brokers will handiest display knowledge for layer 3 hops, and won’t display wi-fi get entry to level knowledge. This is applicable to deploying the TE Endeavor Agent at the Raspberry Pi and configuring it for wi-fi. The one TE agent that can give wi-fi AP knowledge is the TE Endpoint Agent, which is meant to be put in on laptops and private gadgets.
{Hardware} Tick list for the Convention
There are a number of other {hardware} contingencies that will have to be accounted for prior to convention setup can happen.
- A keyboard that may connect with the USB port at the Raspberry Pi
- Laptops that may connect with the Pi Micro SD for TE agent provisioning. We used a number of other answers for this:
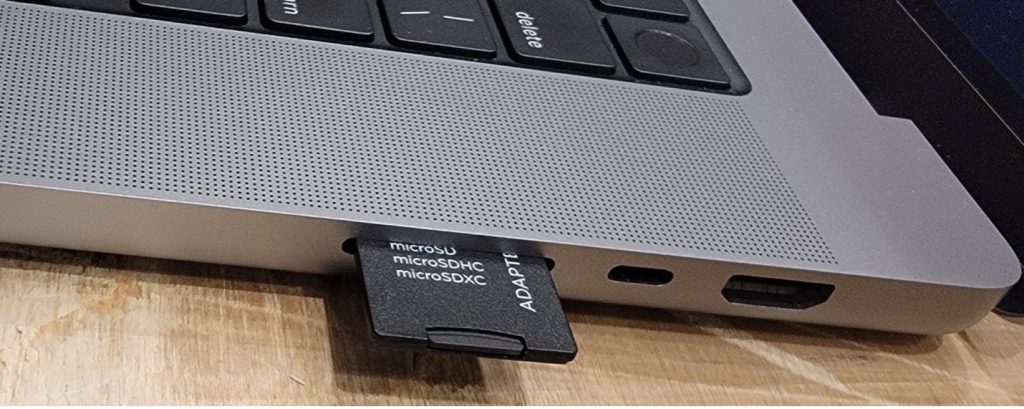
- An SD card to Micro SD adapter, which attached to the SD reader on a Mac pc (the SD reader isn’t to be had on all fashions)
- A Vivitar Micro SD to USB-C adapter, which attached to the USB-C port on a Mac pc
- A Micro SD to USB adapter that got here with the Raspberry Pi 4 Cana Equipment. This was once attached to a USB to USB-C Mac adapter
- Displays that may connect with the Raspberry Pi Micro HDMI port. This can also be so simple as an ordinary HDMI track that connects to the Pi by way of HDMI to Micro HDMI, however those weren’t to be had all through the setup days of the convention. We used two answers:
- A conveyable track that attached to the Pi by way of an HDMI to Micro HDMI cable
- An adapter that attached to the Pi by way of Micro HDMI, attached to a Mac HDMI adapter, with the Mac HDMI adapter attached to a USB-C port at the Mac pc
Pi {Hardware} Meeting
Black Hat 2023 Pi 4 Kits
10x Raspberry Pi 4 Cana Kits, each and every with the next:
- 32GB Micro SD card
- Micro SD to USB adapter
- Case
- Heatsink
- Fan
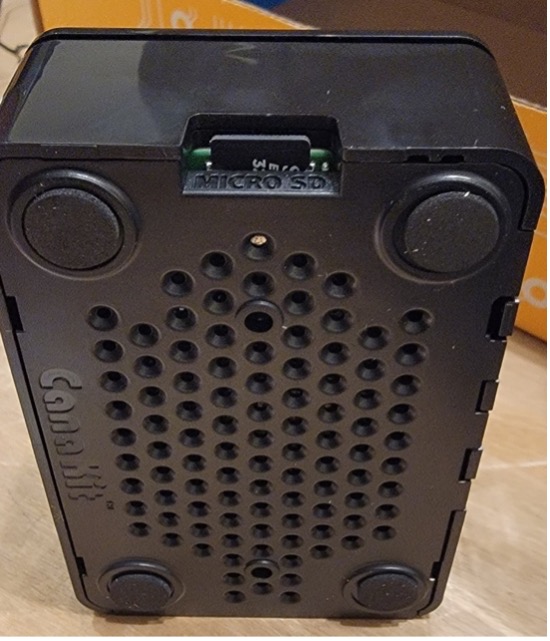
Instance of constructed Pi with heatsinks and fan connected:
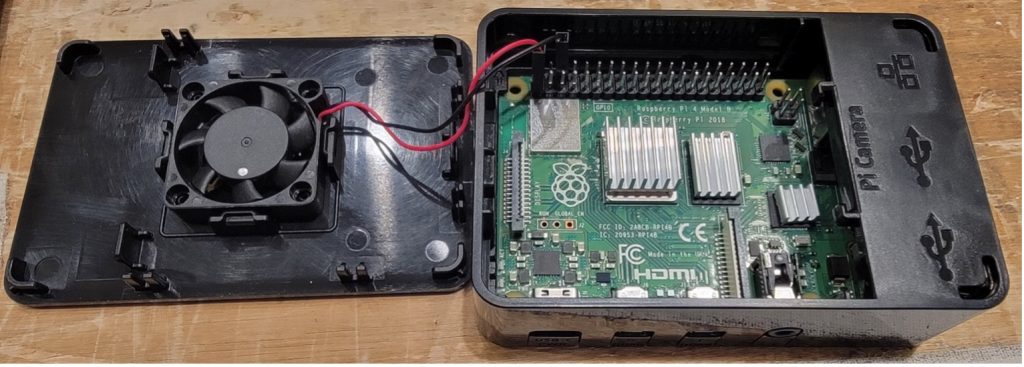
Observe that we had overheating problems with the fan set to drag air out of the case. Orienting the fan to blow into the Pi case was once simpler for our deployment.
Provision the ThousandEyes Symbol onto the Pi Micro SD
The Raspberry Pi can learn Micro SD playing cards. The set up process is to obtain the TE Pi installer from the TE GUI, attach the Micro SDs to the provisioning laptops, after which use balenaEtcher to put in the TE symbol to the Micro SD.
Retrieving the TE Agent Symbol & Documentation
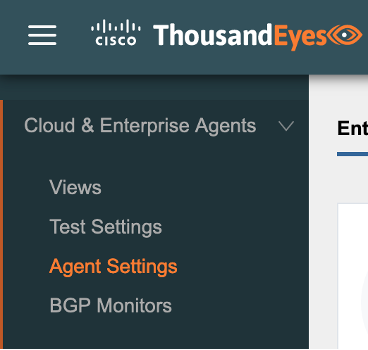
From the ThousandEyes GUI, navigate to Cloud & Endeavor Brokers > Agent Settings.
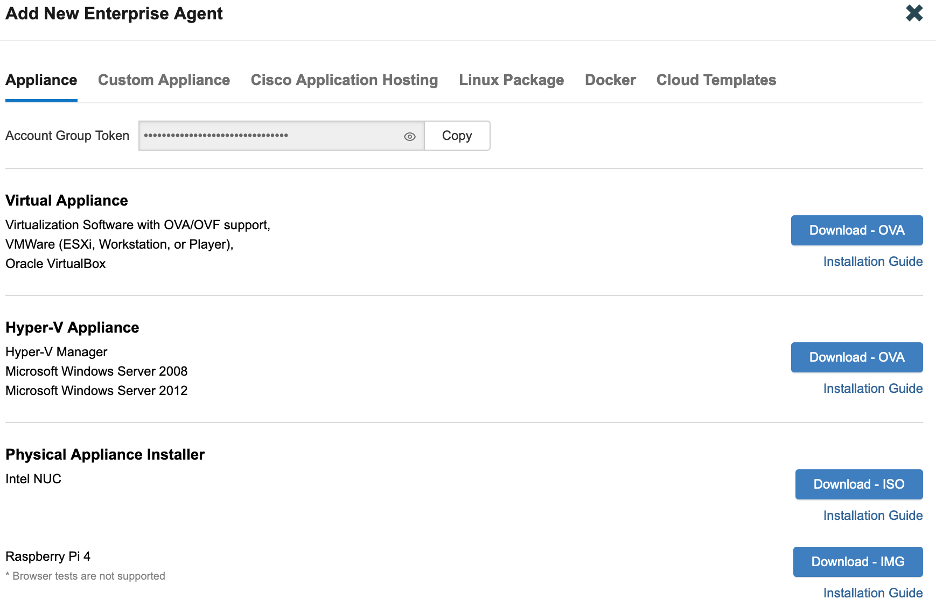
Click on on Upload New Endeavor Agent.

Find the access for Raspberry Pi 4 and click on the Obtain – IMG button. The Set up Information for the Pi set up may be to be had from this web page.
Attach the Micro SD(s) to Provisioning Laptops
If the provisioning laptops don’t have a Micro SD card reader then adapter answers will likely be had to set up the TE symbol to the Micro SD. For Black Hat 2023, we used a mix of the next {hardware} with Mac laptops.
2x Vivitar Mac USB-C to Micro SD adapter
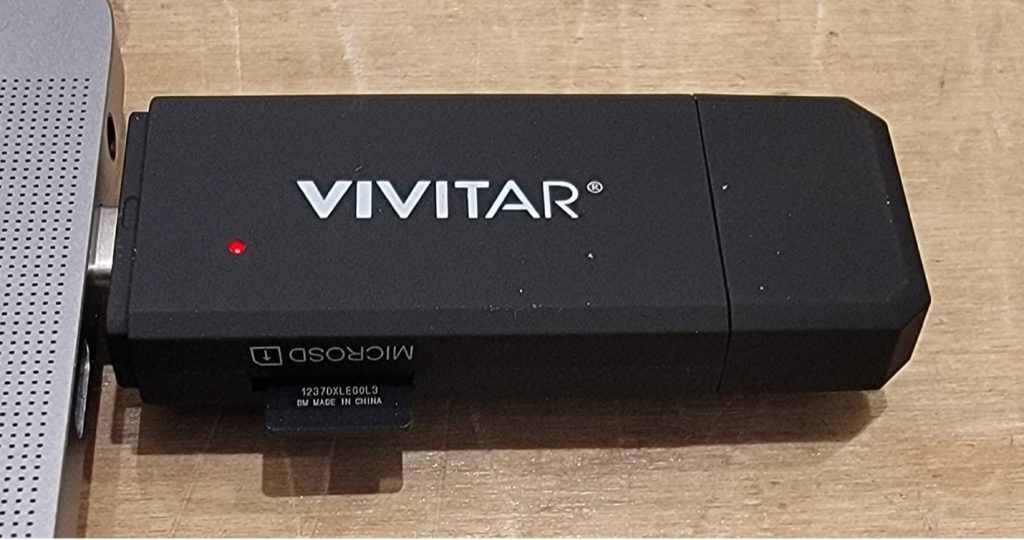
1x Mac USB-C to USB adapter + 1x USB Micro SD Card Reader (incorporated with some Pi bundles—the USB has an extra slot for the Micro SD card, which then plugs right into a USB port—on this case, the Mac adapter proven).

1x Micro SD to SD adapter
Set up the TE Symbol to Micro SDs
We used balenaEtcher to jot down the TE photographs to Micro SD, as coated within the TE Pi deployment information.
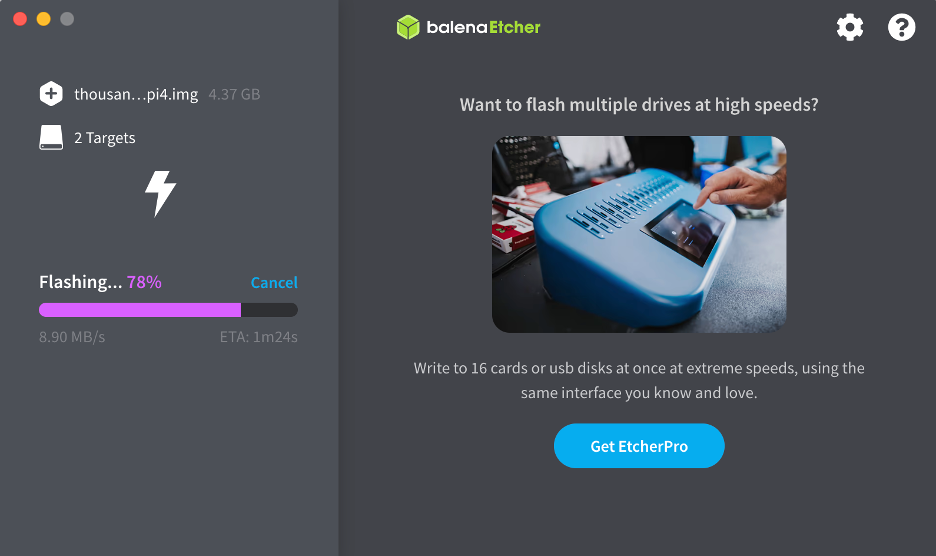
Observe that Etcher can write a couple of photographs to a couple of Micro SDs directly, your handiest prohibit is the choice of Micro SD playing cards that may be attached to the provisioning laptops (USB-C, Micro SD card reader, USB port, and so forth.) directly.
Not obligatory: Use Scripts to Provision Wi-fi that may Persist Throughout Reboots
Developing the wi-fi configuration for the Pi can happen both prior to or after booting the Pi for the primary time with the Micro SD symbol that was once configured within the prior phase. If you want to create the wi-fi configuration prior to booting the Pi, please practice the stairs on this phase. However, if wi-fi isn’t getting used or wi-fi configuration can happen after booting the Pi, this phase can safely be skipped. Please notice that configuring wi-fi after booting the Pi would require enabling SSH at the TE agent, along side any considered necessary firewall regulations to achieve the Pi over port 22.
Additionally notice that this phase calls for particular {hardware} and tool, as coated within the subsequent paragraphs. If the wanted {hardware} and tool isn’t to be had, the wi-fi configuration can nonetheless be achieved the usage of guide procedures given in later sections.
Earlier than starting the configuration, notice that the SSID and SSID password will have to be arduous coded. If the TE agent can’t connect with the hardcoded SSID after reboot, the wi-fi connection will fail. If the hardcoded SSID and password wish to be modified after the preliminary setup, it is going to be essential to (re)allow SSH at the TE agent.
Additionally notice that the TE agent record method will have to be fixed onto a pc to accomplish those steps. At Black Hat 2023, we have been handiest ready to perform this step the usage of a Linux OS. Makes an attempt to mount the Micro SD on Mac didn’t accurately mount the TE agent walls.
- Log in to a Linux method and fasten a Micro SD with the TE agent put in (this process was once coated within the prior phase). Use the Micro SD connection method supplied originally of the information.
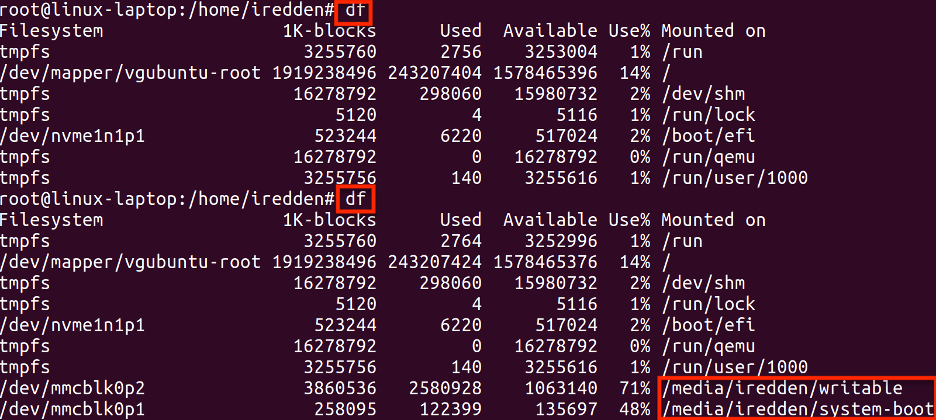
- Run the df command to make sure the fixed walls. The under screenshot presentations the df output prior to and after connecting the Micro SD card, with the 2 fixed walls visual after working the twond df command. Observe the partition paths highlighted in pink, as they’ll be had to create the doit.sh script in Step 5.
- Create a record named rc.native in a designated listing. The particular title ‘rc.native’ is essential for the script to run all through the TE agent bootup procedure.
- Create the script record:
# vim rc.native
- Kind ‘i’ to edit, and kind or paste the next:
#!/bin/bash
/configure_te_pi.sh
go out 0
- Kind ‘:’ then ‘wq!’ to avoid wasting the adjustments and go out the record.
- Create the configure_te_pi.sh script in the similar listing because the rc.native record. Change the <SSID> and <SSID password> fields within the under script with the SSID and PSK that the Pi will connect with. The SSID and PSK will also be modified later, however this will likely require enabling SSH at the TE agent after which connecting to it.
- Create the script record:
# vim configure_te_pi.sh
- Kind ‘i’ to edit, and kind or paste the next:
#!/bin/bash
apt-get replace -y
apt-get set up te-va-unlock -y
apt-get set up net-tools ifmetric wireless-tools -y
ifconfig wlan0 up
wpa_passphrase <SSID> <SSID password> > /and so forth/wpa_supplicant.conf
wpa_supplicant -B -i wlan0 -c /and so forth/wpa_supplicant.conf -D wext
ifmetric eth0 200
sed -i ‘1iauto wlan0niface wlan0 inet dhcp’ /and so forth/community/interfaces
dhclient wlan0
systemctl masks apt-news.provider
systemctl masks esm-cache.provider
- Kind ‘:’ then ‘wq!’ to avoid wasting the adjustments and go out the record.
- Create the doit.sh script in the similar listing because the prior two scripts. Observe that the trails to the /writeable and /system-boot mounts will wish to be stuffed in with the trails accumulated in Step 1.
- Create the script record:
# vim doit.sh
- Kind ‘i’ to edit, and kind or paste the next, enhancing the trails to compare the output in Step 1:
#!/bin/bash
cp rc.native /media/<username>/writeable/and so forth
cp configure_te_pi.sh /media/<username>/writeable/and so forth
chmod +x /media/<username>/writeable/configure_te_pi.sh
chmod +x / media/<username>/writeable/and so forth/rc.native
umount /media/<username>/system-boot
umount /media/<username>/writable
- Kind ‘:’ then ‘wq!’ to avoid wasting the adjustments and go out the record.
An instance of the script created for the output in Step 1 is supplied under.
#!/bin/bash
cp ~iredden/rc.native /media/iredden/writable/and so forth
cp ~iredden/configure_te_pi.sh /media/iredden/writable
chmod +x /media/iredden/writable/configure_te_pi.sh
chmod +x /media/iredden/writable/and so forth/rc.native
umount /media/iredden/system-boot
umount /media/iredden/writable
- Run the doit.sh script. The doit.sh script will carry out the configuration after which unmount the walls, as proven under.

With the above steps entire, the Micro SD card can also be got rid of from the pc and attached to the Raspberry Pi. The Pi will execute the scripts all through bootup and connect with wi-fi, if the SSID configured is reachable and the PSK is right kind. Please see the following phase for setup directions and different concerns.
Additionally notice {that a} stressed connection to the Pi continues to be advisable for preliminary setup. Even if the Pi TE agent can effectively pull a wi-fi IP cope with all through preliminary bootup, the TE agent won’t show a wi-fi IP cope with on a attached track, just a stressed one.
Preliminary Setup of TE Agent
The Provision the ThousandEyes (TE) Symbol onto the Pi Micro SD phase of this information coated the right way to provision TE brokers onto Micro SD playing cards. An non-compulsory phase masking the right way to script wi-fi capacity onto the TE agent symbol was once additionally supplied within the Use Scripts to Configure Wi-fi that may Persist Throughout Reboots phase. This phase will duvet the right way to use the TE agent at the Micro SD card to accomplish preliminary setup.
Attach Micro SD to Raspberry Pi
As soon as the TE symbol has been put in at the Micro SD, attach the Micro SD to the Raspberry Pi.
Attach an Ethernet Cable to the Pi
It can be crucial to understand the IP cope with assigned to a TE agent after preliminary boot with the intention to entire preliminary registration. Whilst a Pi with a wi-fi configured TE agent can pull a wi-fi IP all through its preliminary bootup, it is going to no longer show the wi-fi IP on a attached track, just a stressed IP cope with. Because of this, it’s nonetheless advisable to attach an ethernet cable to a wi-fi Pi prior to preliminary energy on and use the assigned eth0 IP to accomplish preliminary setup. The one choice to a stressed connection on preliminary boot is to spot the wi-fi IP cope with of the TE agent by means of way as opposed to a attached track, corresponding to by way of direct get entry to to the wi-fi AP that the TE agent connects to.
Attach Keyboard and Observe to Raspberry Pi
Two items of {hardware} are used to accomplish the preliminary setup of the Raspberry Pi TE agent: (1) a keyboard that may connect with the Pi by way of USB, and (2) a display that may connect with the Pi by way of Micro HDMI. Preliminary setup can also be carried out with out the keyboard if (a) an IP cope with is assigned to the TE agent by way of DHCP, and (b) the DHCP cope with can also be recognized by way of the attached display or by means of different way. In a similar fashion, preliminary setup can also be finished with out the display if there’s differently to spot the DHCP IP cope with assigned to the TE agent, corresponding to admin get entry to to the transfer attached to the TE agent.
Regardless of the above choices, a attached keyboard and track are advisable for ease of deployment and any wanted troubleshooting.
For the keyboard, we used a Bluetooth keyboard with a indifferent USB fob, however any keyboard that may connect with the Pi by way of USB will paintings.

For the display, we used two separate {hardware} answers.
The primary resolution is a Kenowa transportable track with an HDMI to Micro HDMI cable. The HDMI aspect of the cable connects to the Kenowa, and the Micro HDMI aspect of the cable connects to the Raspberry Pi.

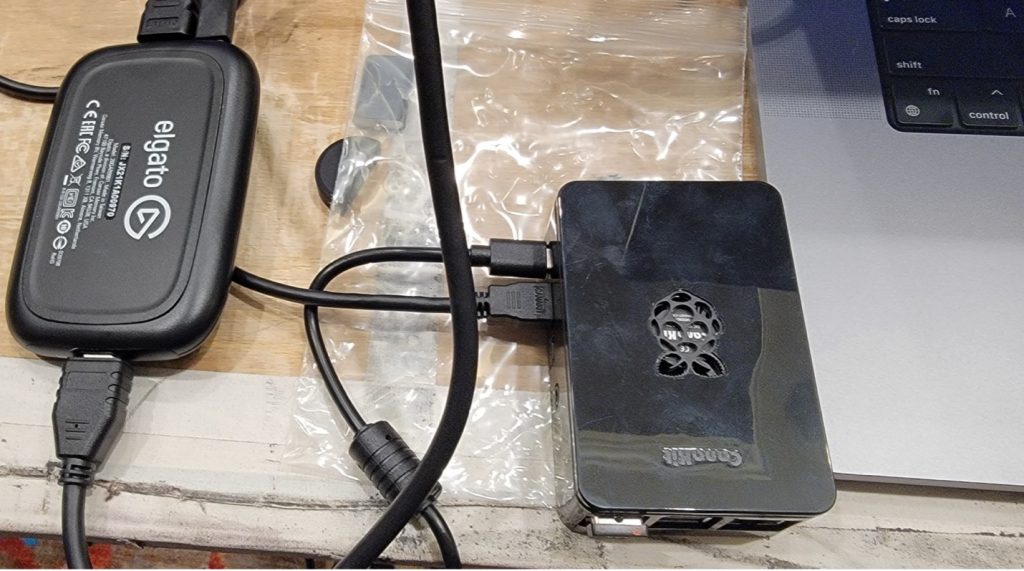
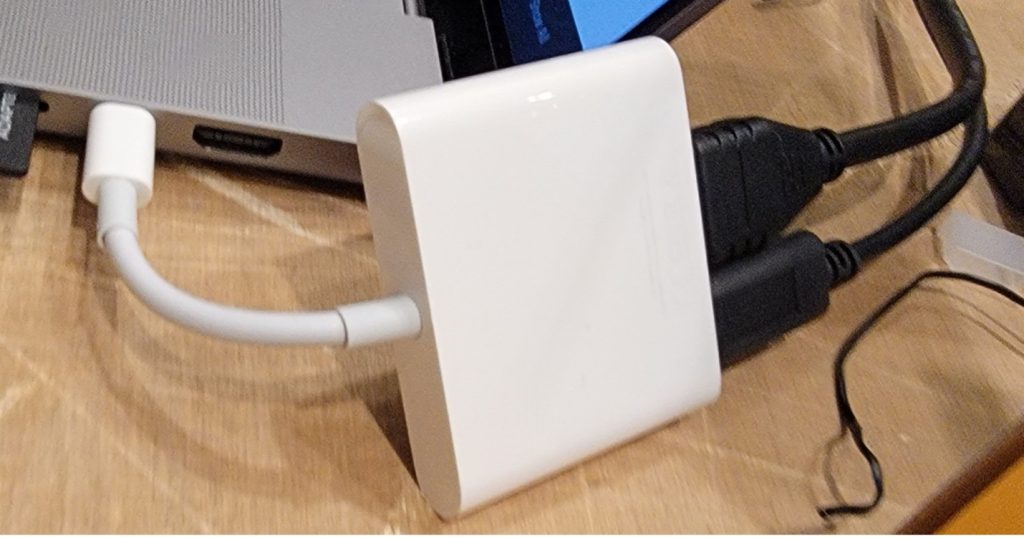
The second one resolution we used is an Elgato adapter that sits between the Raspberry Pi and a Mac pc. The Pi connects to the Elgato by way of a micro HDMI to HDMI cable. The Elgato makes use of a standard HDMI cable to connect with the HDMI aspect of a Mac HDMI to USB-C adapter, with the USB-C aspect of the Mac adapter connecting immediately to a Mac pc.
Verify Pi {Hardware} Connections
With the {hardware} configurations within the prior sections entire (i.e. the Pi is hooked up to an ethernet port, track, and keyboard), attach the Pi energy adapter to start out preliminary boot.
Hook up with the TE Agent GUI
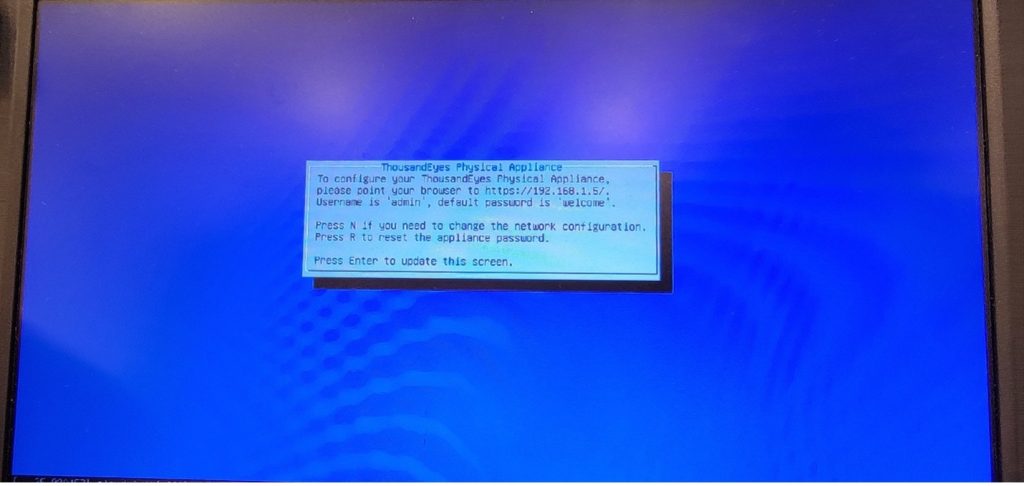
As soon as the Pi is powered on, the TE agent set up will take a couple of mins to run (extra if web get entry to isn’t to be had). As soon as the bootup is entire, the Pi will show a message if an IP cope with was once assigned to the ethernet port by way of DHCP.
If no IP cope with was once assigned to the ethernet port by way of DHCP, the TE agent will show a unique message pointing out no IP cope with is configured. If so, it is going to be essential to both manually assign an IP cope with to the ethernet port the usage of a keyboard, or establish the IP cope with of the wi-fi interface the usage of admin get entry to to the attached wi-fi AP.
- As soon as the IP cope with of the TE agent is understood, connect with the IP by way of HTTPS and check in with username admin and password welcome.


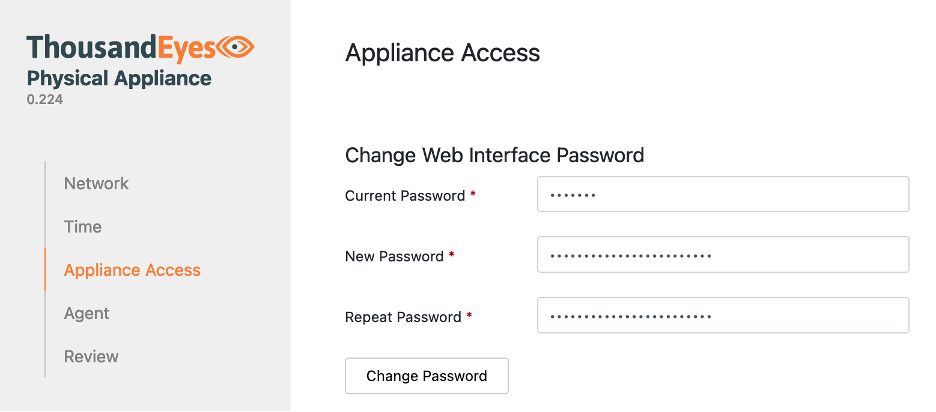
- Trade the default password to one thing extra safe and click on Trade Password.
- The GUI must mechanically take you to Agent within the left menu.

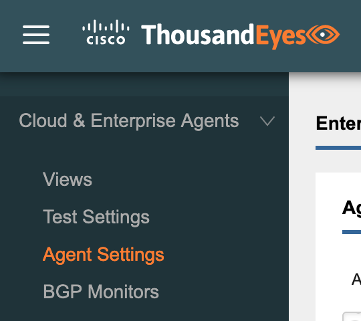
- Holding the ThousandEyes Bodily Equipment GUI open, create a brand new tab for your browser and connect with the ThousandEyes internet GUI, then click on on Cloud Endeavor Brokers > Agent Settings.
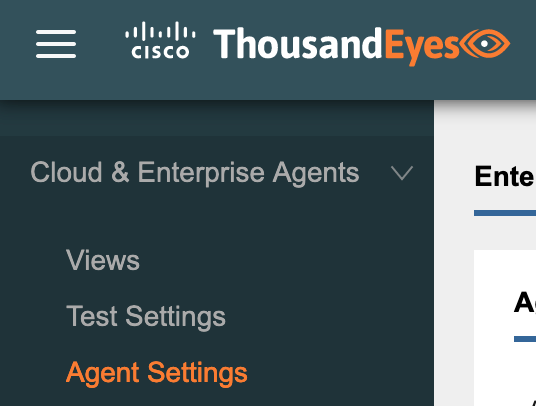
- Click on at the Upload New Endeavor Agent

- Reproduction the Get admission to Workforce Token. Observe: the Reproduction button won’t paintings, during which case click on the attention icon to turn the token and replica it manually.

- Go back to the TE agent GUI and paste the Account Workforce Token into the Agent Click on Proceed.
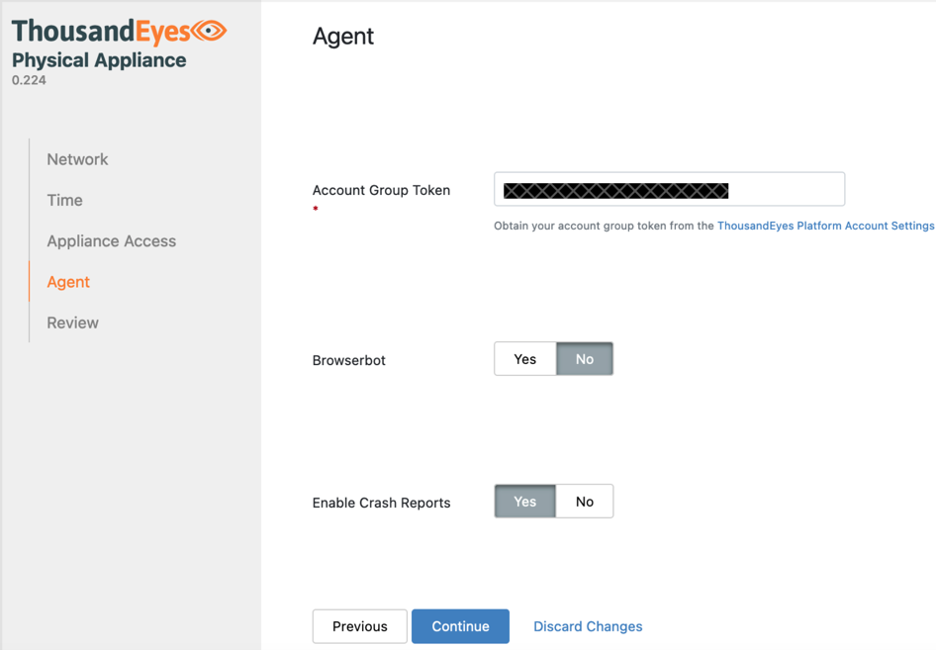
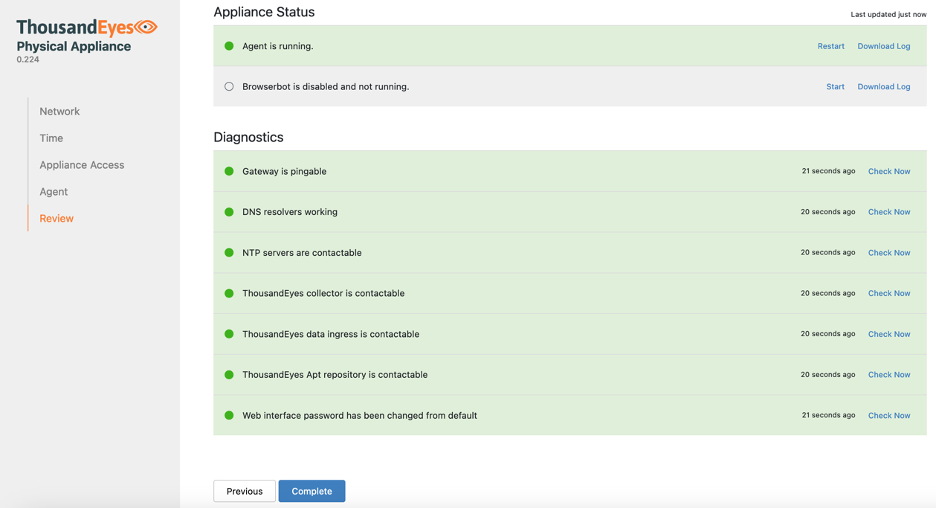
- The GUI will mechanically load the Overview Equipment Standing and Diagnostics fields must alternate to inexperienced because the registration completes. Click on the Whole button.
- Click on at the Community tab.

- Configure the hostname for the agent.

- Scroll all the way down to the DNS configuration and input the interior and Exterior DNS servers. By means of Default, the agent will use the 208.67.222.222 and 208.67.222.220 exterior Umbrella DNS servers. Those can also be moved to DNS server 3 and four if inner DNS servers are most well-liked.

- Scroll down and click on at the Save Adjustments Observe that the Making use of community settings pop-up would possibly get caught. Reload the web page to transparent it.
- Hook up with the ThousandEyes internet GUI and make sure that the agent presentations as lively below Endeavor Brokers. For extra steering, please see the phase Validate Wi-fi Interface within the ThousandEyes Internet GUI.
Handbook Wi-fi Config Monitor
The Raspberry Pi TE agent can handiest attach by way of a stressed connection the usage of the default set up. If wi-fi is wanted for the deployment however the essential {hardware}/tool was once no longer to be had for the Not obligatory: Use Scripts to Configure Wi-fi that may Persist Throughout Reboots phase, or if the TE agent has already been deployed, the sequence of guide configuration steps beginning on this phase can be utilized to configure continual wi-fi on a Pi TE agent.
Handbook Wi-fi Config Monitor: Hook up with the TE Agent by way of SSH
Documentation for connecting to a Pi TE agent by way of SSH can also be discovered on this information.
Handbook Wi-fi Config Monitor: Jailbreak the TE Agent (to permit Wi-fi config)
Jailbreaking the TE agent is essential for escalating to root and acting the instructions essential to construct the scripts for the wi-fi configuration.
We must replace the Ubuntu OS prior to working the jailbreak command. Hook up with the TE agent by way of SSH, then run the next two instructions to first replace the OS after which jailbreak the set up:
$ sudo apt-get replace
$ sudo apt-get set up te-va-unlock
With the TE agent effectively jailbroken, we will be able to now escalate to root and carry out the remainder of the configuration.
Handbook Wi-fi Config Monitor: Configure Wi-fi that may Persist Throughout Reboots the usage of handiest the Pi
Earlier than starting this phase, notice that the SSID and SSID password will have to be arduous coded. If the TE agent can’t connect with the hardcoded SSID after reboot, the wi-fi connection will fail. If the hardcoded SSID and password wish to be modified after the preliminary setup, it is going to be essential to (re)allow SSH at the TE agent and connect with it over SSH.
- Escalate to root and create a record named rc.native within the /and so forth listing. The title is essential for the script to run all through the TE agent bootup procedure.
Create the script record:
$ sudo su
# cd /and so forth
# vim rc.native
- Kind ‘i’ to edit, and kind or paste the next:
#!/bin/bash
/configure_te_pi.sh
go out 0
- Kind ‘:’ then ‘wq!’ to avoid wasting the adjustments and go out the record.
- Run the next to set the script permissions:
# chmod +x /and so forth/rc.native
- Create the configure_te_pi.sh script within the best stage / listing. Change the <SSID> and <SSID password> fields within the under script with the proper values. The SSID and password will also be modified later, however this will likely require a later SSH connection to the agent.
- Create the script record:
# cd /
# vim configure_te_pi.sh
- Kind ‘i’ to edit, and kind or paste the next, changing the <SSID> and <SSID password> fields with the proper values:
#!/bin/bash
apt-get replace -y
apt-get set up te-va-unlock -y
apt-get set up net-tools ifmetric wireless-tools -y
ifconfig wlan0 up
wpa_passphrase <SSID> <SSID password> > /and so forth/wpa_supplicant.conf
wpa_supplicant -B -i wlan0 -c /and so forth/wpa_supplicant.conf -D wext
ifmetric eth0 200
sed -i ‘1iauto wlan0niface wlan0 inet dhcp’ /and so forth/community/interfaces
dhclient wlan0
systemctl masks apt-news.provider
systemctl masks esm-cache.provider
- Kind ‘:’ then ‘wq!’ to avoid wasting the adjustments and go out the record.
- Run the next to set the script permissions:
# chmod +x /configure_te_pi.sh
Reboot the Pi and check to substantiate that the wi-fi NIC can connect with the ThousandEyes internet account.
Validate Wi-fi Interface within the ThousandEyes Internet GUI
Verify Stressed out and Wi-fi IPs
- From the ThousandEyes internet GUI, navigate to Cloud & Endeavor Brokers > Agent Settings.
- Establish a registered TE agent with a wi-fi interface, then click on on it.
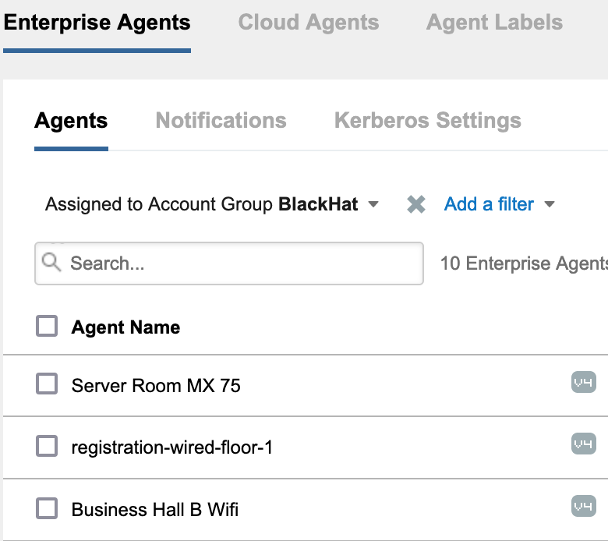
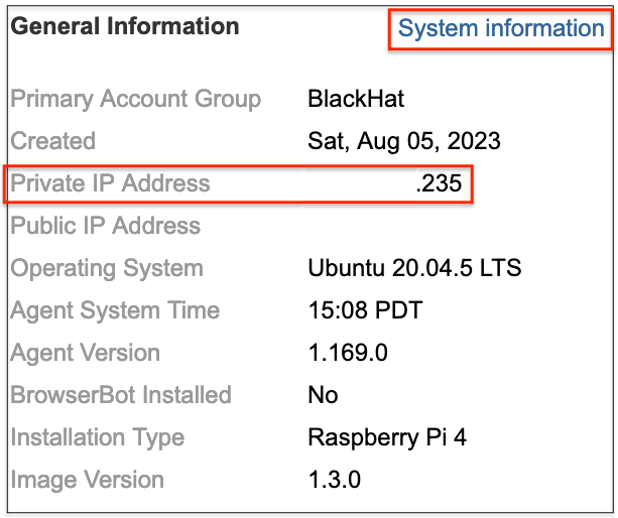
- Find the Normal Data The personal IP cope with of the TE agent will likely be displayed, which is the IP cope with that the TE agent used to connect with the ThousandEyes internet supervisor. If the TE agent has each an ethernet and wi-fi port, you’ll click on the Device Data hyperlink to substantiate which IP cope with is assigned to each and every interface.
Verify Stressed out and Wi-fi Interfaces for Checks
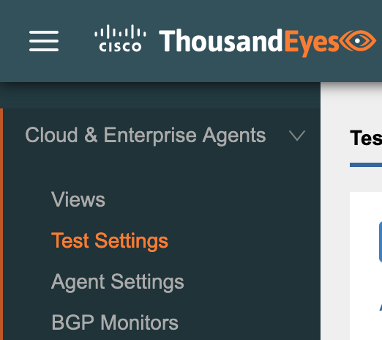
- Navigate to Cloud & Endeavor Brokers > Take a look at Settings.
- Extend some of the checks after which extend the Brokers
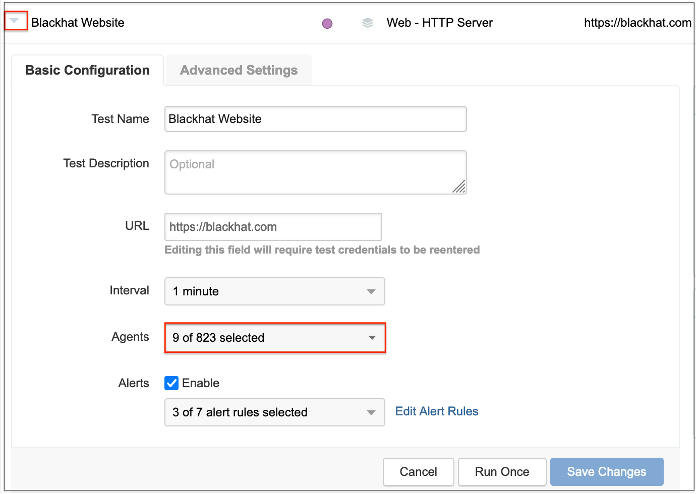
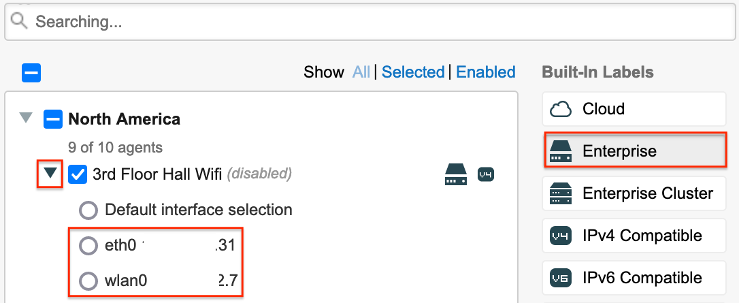
- Click on at the Endeavor button and extend the dropdown subsequent to an agent with wi-fi enabled. If the agent has each a stressed and a wi-fi interface enabled, they’ll each be displayed as within the screenshot under.
Appendix
GitHub with scripts
ThousandEyes Wi-fi Setup GitHub
ThousandEyes Ports and Protocols
For TE brokers to perform accurately, they’ll wish to each connect with ThousandEyes over the web and feature firewall ACL get entry to to accomplish any configured checks. Consult with the next record for lists of ports and protocols consistent with area.
Script Purposes Defined
Scripts to allow wi-fi capability of the Raspberry Pi TE agent on startup are incorporated within the Not obligatory: Use Scripts to Provision Wi-fi that may Persist Throughout Reboots and Handbook Wi-fi Config Monitor sections of this information. This appendix phase explains the script capability line by means of line.
rc.native – this script will run as a part of the TE agent startup procedure.
#!/bin/bash – initialize the script to run the usage of bash
/configure_te_pi.sh – run the configure_te_pi.sh script
go out 0 – go out
configure_te_pi.sh – this script will configure the TE agent for wi-fi capability
#!/bin/bash – initialize the script
apt-get replace -y – replace the underlying Ubuntu OS
apt-get set up te-va-unlock -y – jailbreak the TE agent to permit further sudo get entry to
apt-get set up net-tools ifmetric wireless-tools -y – set up instruments to permit wi-fi capability
ifconfig wlan0 up – carry up a wi-fi LAN interface
wpa_passphrase <SSID> <SSID password> > /and so forth/wpa_supplicant.conf – configure SSID and PSK values for the wi-fi connection and write them to the wpa_supplicant.conf record
wpa_supplicant -B -i wlan0 -c /and so forth/wpa_supplicant.conf -D wext – imports the wpa_supplicant record and configures the wi-fi LAN interface to make use of the wext motive force
ifmetric eth0 200 – set the stressed interface to have a decrease precedence than the wi-fi interface
sed -i ‘1iauto wlan0niface wlan0 inet dhcp’ /and so forth/community/interfaces – configure DHCP for the wi-fi interface
dhclient wlan0 – allow DHCP for the wi-fi interface
systemctl masks apt-news.provider – save you apt-news.provider from working. See the Wi-fi TE Agent Replace Failure phase for more info
systemctl masks esm-cache.provider – save you the esm-cache.provider from working. See the Wi-fi TE Agent Replace Failure phase for more info
Wi-fi TE Agent Replace Failure
Throughout trying out of the wi-fi TE agent for Raspberry Pi, it was once spotted that the brokers misplaced connectivity with the ThousandEyes internet supervisor after a variable period of time. Troubleshooting a couple of failed brokers recognized logs related to updates to the apt-news.provider and esm-cache.provider processes in an instant prior to failure of the wlan:
syslog
Aug 6 02:17:04 registration-wireless systemd[1]: Began PackageKit Daemon.
Aug 6 02:17:20 registration-wireless systemd[1]: Beginning Replace APT Information…
Aug 6 02:17:20 registration-wireless systemd[1]: Beginning Replace the native ESM caches…
Aug 6 02:17:21 registration-wireless systemd[1]: apt-news.provider: Succeeded.
Aug 6 02:17:21 registration-wireless systemd[1]: Completed Replace APT Information.
Aug 6 02:17:22 registration-wireless systemd[1]: esm-cache.provider: Succeeded.
Aug 6 02:17:22 registration-wireless systemd[1]: Completed Replace the native ESM caches.
Aug 6 02:18:38 registration-wireless systemd-networkd[667]: wlan0: Misplaced service
Additional information at the two amenities can also be discovered right here:
Overlaying the amenities so they don’t seem to be run by means of systemd resolved the failure of wlan0:
$ sudo systemctl masks apt-news.provider
$ sudo systemctl masks esm-cache.provider
The above instructions have been then added to the startup scripts.
We’d love to listen to what you suppose. Ask a Query, Remark Beneath, and Keep Hooked up with Cisco Safe on social!
Cisco Safe Social Channels
Proportion:
[ad_2]